Tuesday, December 28, 2010

Fried Chicken

The holiday season brings out the best in all of us. Cheer, goodwill toward (wo)men and all those warm and fuzzy things. It also brings out the glutton in all of us. I celebrated this wonderful season by making fried chicken. Because nothing brings good cheer like a big 'ol pile of fried chicken.

The fried chicken really came out of necessity more than anything else. My father bought a whole chicken for dinner and we were all simply tired of roast chicken. There also happened to be a pot of oil on the stove from my sister's doughnut-making episode the day before. Being the green enthusiast I am, I couldn't possibly let all of that good oil go to waste. Frying was the solution!

My father dutifully pieced the chicken from its whole form (which for never having done it before, did a pretty nice job) then we bathed each piece in some beaten eggs and then a coating of flour, seasoning the pieces at each step in its fried chicken journey.

You know, if I were this free-range, organic, hormone-free chicken I would feel pretty darn good that I was going to finish my existence on earth as some crunchy fried chicken. A good life, indeed. Just saying.

After dredging in the flour, we placed the pieces into a large pan of 350 degree oil and let them fry until golden brown, about 3-5 minutes on each side depending on the piece. We had about 2 inches of oil in our pan, hence the need to turn them over.

The result was a deliciously crispy bird we all enjoyed with, what else, wing sauce! Because my family has an odd obsession with this spicy sauce, we smothered the chicken with it and served it up with the classic accompaniment celery and carrots and a homemade ranch-like dipping sauce.

The ingredients we used (from the chicken to the flour to the veggies and even the sour cream for the ranch dip) were all organic and organic fried chicken never tasted so good!

Monday, December 27, 2010

Cranberry Orange Bread

One of the things I love about the holiday season is the absurd amount of baked goods that seem to circulate in my life. Cookies, cakes, breads and every variety of sweet thing imaginable. So, of course, I would be out of the loop if I didn't contribute to this flurry of baking myself!

Just before Christmas, Walnut and I had a little doggie playdate with one of my favorite puppies, Gable. What playdate would be complete without some freshly baked holiday items? No playdate of mine!


That afternoon I baked a lovely cranberry orange bread, packed with fresh squeezed orange juice and fresh (not frozen or dried) cranberries. Dusted with a little powdered sugar, it was a lovely complement to the boozy eggnog I also brought over. Yes, you're allowed to bring booze to doggie playdates. Not sure if the same rule applies to children's playdates. I figure I have a few years before I need to worry about that.


Gable and Walnut enjoyed playing (feisty little ones!) while their respective mommies sipped the whiskey-spiked eggnog and this delicious, sugar dusted cranberry orange bread. A toast to the holidays indeed!

Still in the baking mood post-Christmas? Try this Cranberry Orange Bread recipe. 

Thursday, December 23, 2010

Vegan Thumbprint Cookies

Considering that I'm about to endeavor into the frozen north, aka my parent's house, aka a place that always has a ton of delicious fatty foods around, I figured I'd bake up some low-cal cookies to satisfy my sweet tooth pre-Christmas.

I came across this recipe for Vegan Thumbprint Cookies and it seemed utterly perfect - a little sweet, very little fat and a lot of crunch. Almonds and oats make up the most of the batter, keeping it light as well. The love that the recipe instructs you to put the oats and the almonds, respectively, into the food processor to achieve a soft, flour-like consistency; it provides a really nice consistency to the batter. And the use of maple syrup prevent these thumbprints from getting too sweet- they leave the jam for that!

I used a Plum Jam circa Summer 2009 that I had in the cupboard. My parent's have several fruit trees on their property so every summer is canning season there and this jar was straight is my mother's kitchen. Slightly chunky and a deep purple color, it's a delicious jam that I've yet to make on my own. I figured why waste my money on fruit shipped in from god knows where when I can get it straight from the tree that grew along with me as a child. Quaint, right?


Needless to say, the jam was perfect on these cookies and, though they took a bit longer to cook than the recipe suggested (I blame my spotty oven) they turned out really nicely, with a good crunch and just enough sweet.

If you're looking for a lighter alternative to Christmas cookies this week, give this recipe a try!

Don't we like the little gnome poking his head through the bushes?!

Wednesday, December 22, 2010

Crispy Toasts!

As you know, I'm on a budget these days, so no more truffled cheese, blinis with caviar or full priced cocktails at over-priced LA bars for me! To deal with my utter culinary sadness (and empty belly) I've been seeking out my favorite food obsessions and figuring out how to make them at home on the cheap.

Challenge #1: Raincoast Crisps

Oh yes, you know these little devils. Beautiful packaging, all natural and lovingly tucked into a peek-a-boo box so you can see the deliciousness inside. Let's be honest, I'm obsessed. Like box-a-week obsessed. Like no-money-in-my-pocket-for-dinner-because-all-I-want-is-crisps obsessed. At anywhere from $6 - $9 a box, this obsession ain't cheap. Luckily I found an amazing recipe to recreate them at home!

From creating this recipe, I now realize why these are so expensive. They are quite laborious and time-consuming, even if most of the time is inactive. First you make the bread mix, chop and add in nuts / fruit / herbs, bake for 30 minutes, then cool, then freeze (oh really) then slice (painful, I'll explain) then toast, turn and toast again. Geez!

Crisp Add-Ins: pecans, sesame seeds, almond meal, rosemary and homemade raisins (from my dehydrator)
Slicing the frozen bread into crisps: not easy! The frozen bread is tough to slice through
Crisps laid out in rows on baking sheet, ready for the oven
Though these were a bit of work, the results are honestly so close to the original I'm never going back. The recipe I used called for pecans, rosemary, raisins and sesame seeds and truly mimicked the real (expensive) thing.
The final product
If you have some extra time (perhaps over the holidays when you won't have any desire to be away from the kitchen anyway) I highly recommend making these. Packed up in an airtight container they will last for weeks, if you don't eat all of them the second they come out of the oven.

I'm making some balsamic jelly (think gelée) to go with some goat cheese on these delightful crisps. I'll report back later on how the combo works out.

Tuesday, December 21, 2010

Roti Bread

I came across a really simple recipe for one of my favorite Indian foods, Roti bread, today and thought I'd give it a try. As an "Everything But The...Oil" recipe, it went to bat in the test kitchen to see if it was easy and delicious enough to be considered for our product line.

For some reason I always thought Roti would be a difficult bread to make but the recipe has only six ingredients, almost all of which most people keep in their kitchens already.

The recipe I used called for Garam Masala as the spice addition but I didn't have it on hand, so I substituted with some curry powder. The curry powder still produced delicious results and added a nice yellow color to the dough. 

The dough is a simple flour / water / oil mix and it needed a little resting time after mixing. Shaped into about 2" balls and then rolled out and oiled on each side, I tossed each one individually into an oiled pan and gently cooked them on each side for less than a minute.  Easy and fast, this is a shocking realization. Someone should obviously employ me in the ways of roti making full time.


The result was a fluffy yet crisp bread in a circle-like shape (hey, it was my first try, let's call me a roti maker in training) and it tasted nicely of curry. Check out the finished product below. I whipped up some curried yogurt dip with lemon and a little salt and pepper for dipping. Dinner is served! Maybe I'll throw in a vegetable and some protein...or maybe I'll just devour the whole plate full.


Want to know more about what Garam Masala really is? Read after the jump.

Monday, December 20, 2010

Bacon Pretzels

UPDATE: We finally decided to name our new dog Walnut but Bacon came in at a very close second! So, without a Bacon to play fetch with, I needed to do some kitchen work with bacon to get my fix.

We had a holiday party Saturday night and I figured I'd dress up some plain pretzels with a little chocolate and bacon. Because, why not? I dipped salted traditional pretzels in melted chocolate, which I brought to a liquid consistency in a double boiler, and then sprinkled on some bacon bits.

I think the phrase "double boiler" makes some people nervous, but it's really very easy. You don't need any fancy equipment, just a pyrex glass bowl (which is the most common type of glass that can withstand really high temperatures) in a size that fits over the top of a pot. Fill the pot with at least two inches of water and place chocolate chips (or any bar chocolate) in the bowl.

Here are my tips for using the double boiler method to melt chocolate (which is far superior to using a microwave):
  • Always keep your burner to medium or low heat, never high
  • Check the water in the pot every few minutes to make sure you have enough to keep your steam going
  • Use a spatula to constantly move the chocolate around in the pyrex bowl; if you leave it for more than a 15-20 seconds without stirring, the chocolate can burn
  • Wear an oven mit on one hand while the other hand does the stirring; the bowl will be slippery underneath from the steam and can move around easily, so it's important to be able to hold it in place
  • Prepare your foods to dip and your drying surface before you even get started with melting the chocolate; once you get started there's no going back
  • This process has a fancy named called "tempering" which basically just means melting
Once all of your chocolate chunks have dissolved into creamy goodness, start dipping!
To make my life easier, I only dipped one side of the pretzels, then placed them individually on sheets of parchment paper laid out on the counter. Every few pretzels I would stop to sprinkle some delicious bacon bits (store bought, I know, I'm a cheater!) over the top so they could adhere to the chocolate before it dried.

I left the pretzels about 20 minutes to make sure they were thoroughly dried before removing them from the parchment and placing them in an airtight container in advance of my party.


You can definitely "bacon-ize" any sweet or salty snack with some chocolate and bacon. I'm sure your friends will appreciate the porky punch you are providing.

Friday, December 17, 2010

Surprise!

Someone very special came into our life yesterday, but we just can't figure out what to call him!

We're in full blown debate over names (and of course all of my picks are food-related). Would love to hear your thoughts on what we should name our little mister.
  1. Bacon
  2. Charlie
  3. Walnut
  4. Hemingway 

Thursday, December 16, 2010

Homemade Jerky - Part 2

I know you've been waiting anxiously for this, so here's the finale of the homemade jerky extravaganza!!!

So you've marinated your beef overnight and it's getting nice and flavorful. The jerky you see below marinated overnight before I drained it and made the final prep for the dehydrator.


Drain the beef thoroughly and remove any remaining moisture by placing the individual pieces on a double thick paper towel. I lay mine out in rows and then roll them up so the paper towel pulls off the moisture on both sides. Feel free to press firmly with your hands when you roll, beef can take a little man-handling.


The surface of each piece should feel pretty dry to the touch once you've patted it down via the paper towel method. The surface should also look dry and no liquid should be welling up. Place the pieces in an evenly on a rack of your dehydrator.


Once you're dried every piece thoroughly and loaded your dehydrator, it's time to get cooking. Well, not cooking, we're drying! Now, my dehydrator only goes on and off so the way to regulate temperature is by opening or closing vents on the top and bottom. I leave my vents at half and half so that most of the heat from the coil in the bottom is retained, but there's still space for moisture to vent. I highly recommend you consult the manual for your dehydrator before determining the temperature and duration for drying your jerky as it can vary greatly.

The top half of my dehydrator has apples and orange slices, while I put the more "wet" jerky on the lower trays
Vents half-open, I left my jerky for about 6 hours before checking it. The great thing about using a consistently low temperature dehydrator is you don't have to worry about the temperature or moisture level changing as long as you leave it alone. There are recipes for using an oven at 200 degrees but honestly I think that's too high to achieve great jerky results. It cooks faster than it dries and it's easier to burn as a result.

After 6 hours most of my jerky was done to perfection. About a third of the thicker pieces still needed some time, so I left them in for a few more hours. When you're not sure about how long your jerky will take, just check it every hour or do and do a doneness* test.

How to know doneness of your jerky:
  • Meat has turned a dark brown/black color
  • There are no "shiny" spots on the meat, that is, the fat has thoroughly melted into the meat and any moisture has evaporated
  • It's crunchy - bite into it, does it taste like jerky? That's always a good sign :) 
Here's a pic of some of my finished jerky. Overall I spent about $5 on my jerky meat and got about one and half times the amount of meat in a typical $7 - $10 bag of store bought jerky. Hands on time was probably 25 minutes overall, as most of the work is inactive while it marinates and then dries.


I thoroughly recommend investing in a dehydrator and trying out this yummy jerky recipe. Your friends will think you're so cool.

*NOTE: In case you were wondering (as I was) if "doneness" is a word, check out my new favorite website isthisaword.com.

Happy (belated) Hanukkah!

I know it's a little late, but my family did our Hanukkah dinner last night. It's never too late for latkes though, right?

Here's a look at the grand plate of latkes we served last night...homemade from scratch with love from, er, Trader Joe's. Hey, no judging!


My cousin also brought the most amazing Hanukkah cake for us to indulge in. The delectable, dark chocolate ganache was such a light, refreshing end to such a light meal...if you don't count the fried latkes....or the schnitzel...or the tri tip...or the jelly doughnuts. Gym time for me today! 

(BTW my cousin is a professional pastry chef. Don't try this at home kids.)
It's also never too late to share a little Hanukkah history! So, here's a brief overview of the holiday for those of you that don't follow the way of the tribe. And no, I didn't make this up myself. It's a little excerpt from the all-knowing resource known as the internet. The internet is always right, right? Read all about the history of Hanukkah after the jump, as well as a link to a latke recipe.

Wednesday, December 15, 2010

Taco Tuesday

I can never pass up the opportunity to make Taco Tuesday. Second day into the week, we all deserve some delicious tacos, served up with our favorite condiments and salsas.

Last night I decided to try something very different with my tacos, using the ingredients I had laying around the kitchen. Complemented by some fresh tortillas from the market (they were still warm when I bought them, how could I possibly resist?) they made the perfect, easy dinner.

First I cut up a large butternut squash and placed it in the over with some oil, salt and pepper for about an hour, until I could easily pierce it with a fork. Once fork-tender, I cut the squash up into pretty little orange cubes and sweetened them with a bit of maple sugar and bumped up the flavor by adding some coarse salt and a little pepper.

On to the tofu, I cubed it the same size as the squash and pan-fried it. As it was super-firm tofu, it can withstand a good pan frying without falling apart. While in the pan I seasoned it with salt, pepper, garlic, chili powder, cumin and coriander. After the tofu gained a light, crispy texture on the outside I added the squash so it could pick up some of those wonderful spice flavors.

I fried up some tortillas and loaded it up with my yummy taco mixture, topped them off with some goat cheese (I love goat cheese with coriander and cumin, something about it...) and some fresh cilantro.

Delicious and the active cooking time was only about 15 minutes. Vegetable, protein, a little fat and a little green, this light yet satisfying dinner will definitely be going into my "to make again" file.

Tuesday, December 14, 2010

Homemade Jerky

So I'm keeping to a lean budget these days but I still want to eat well - and homemade. I won't skimp on ingredients so I've found one of the best ways to extend my dollars is by making everything from scratch, even those items that you'd never imagine making at home. Crackers, bread, jam, all of those items we're so used to buying from our favorite store brands are great, but nothing compares to making it yourself.

One of the "luxury" items I'm keeping out of the grocery cart these days is beef jerky. I love the store bought kind but I only buy the best brands (organic, grass fed beef), hence the luxury. In order to make this at home (which I've done a few times before) I looked up several recipes and built the one that suited my tastes and wallet, and best replicated my favorite packaged brands.

Since I live near LA's Korea town, I'm apt to visit the ethnic grocery stores in the area and one thing the Koreans do very well is beef. Top quality and perfectly cut for Korean BBQ cooking, these neat little cuts of meat are perfect for producing great tasting (and looking) homemade jerky.

In my research, I found many recommended using beef eye of round or top round for jerky. For today's batch I chose an eye of round pre-cut in a neat 5 inch by 7 inch rectangle. It's so pretty! And don't you love the "FRESH" sticker, as if that's the signifier for quality? Love it.
I got out my fabulous ceramic knife (which makes cutting meat super easy) and began by cutting the rectangle into four equal sized pieces. I cut with the grain because Daniel likes the "chew" you get cutting it this way. If you prefer a jerky that more easily falls apart and is easier to eat, try cutting against the grain. Depending on the cut of your meat and the amount of marbling (fat), your jerky may need to dehydrate less since the fat is more distributed in little pockets. But I'll elaborate on that in my next post. Back to my meat...
The meat I bought was about 1/2" thick so to make the pieces a little less toothsome, I very carefully sliced them to a few milimeters thick. Depending on the piece, this meant cutting horizontally either in half or thirds.  The below picture illustrates just how thin I like to cut it.
Once my meat was properly sliced, and of generally equal sized pieces, I made my marinade. The marinade I like is a mix of several Asian style sauces I always keep in the fridge. Recipes vary greatly so feel free to add/subtract based on your tastes.
Pour the following into a flat-bottomed ceramic or glass pan/bowl so that when you place the meat everything will be swimming in the sauce. No diving!

1/4 cup soy sauce
1/3 cup teriyaki sauce
1/4 cup rice wine vinegar 
2 tablespoons worcestershire
3 tablespoons ponzu sauce (I swear, I could drink this stuff it's so good)
Juice of one lime
2 cups water (enough to cover the meat once added, add a little more if needed)
Few cranks of black pepper

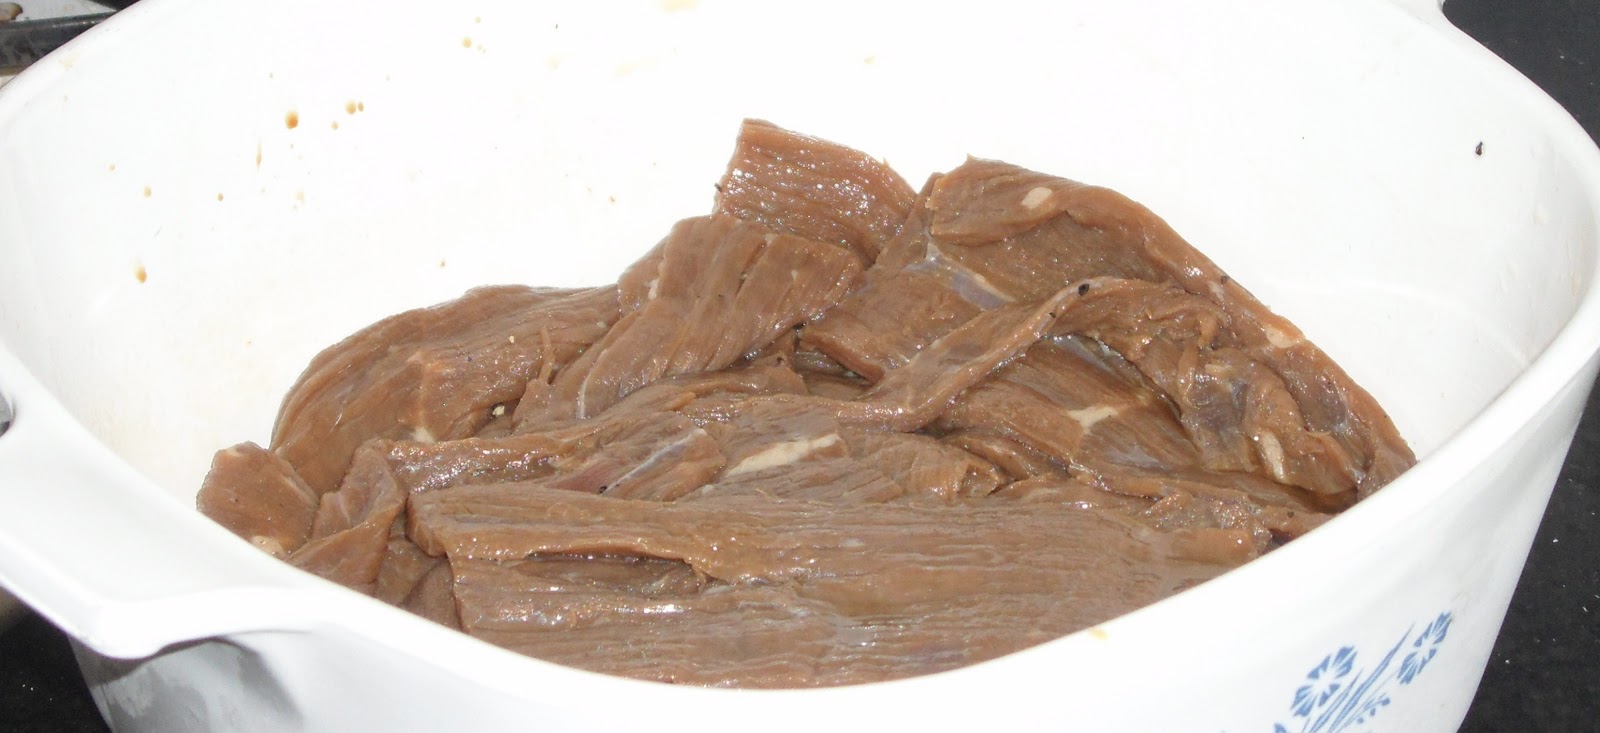
Once I added the meat, I weighed it down with a plate and put in the refrigerator. Depending on the flavor you want, I recommend anywhere from a few hours to a day. I'll probably leave my in until the morning (I put it in the fridge around noon today).
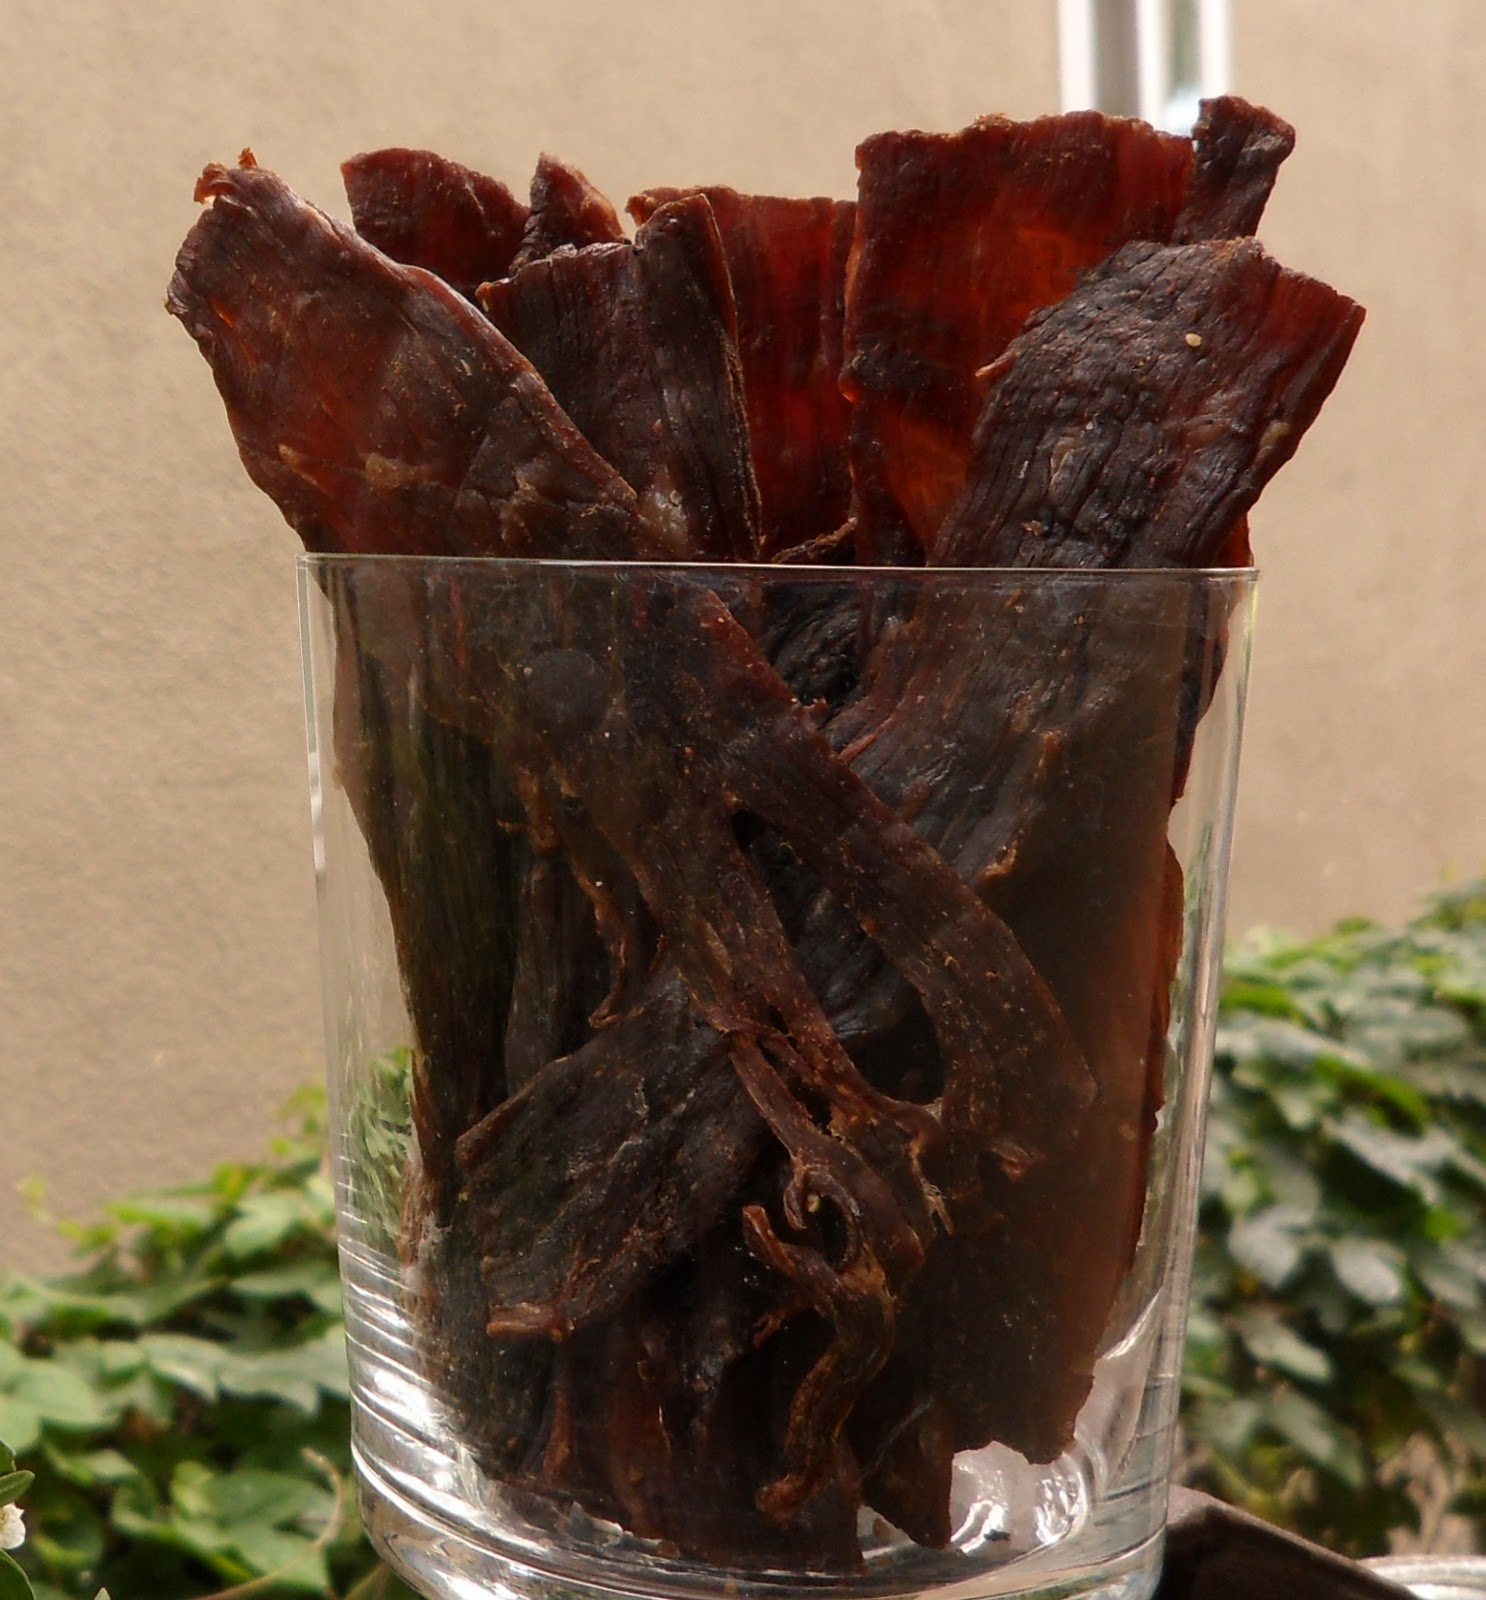
To finish, drain the marinade, dry each piece of meat on a paper towel until the surfaces are dry and arrange them in a single layer in your dehydrator. I'll capture this when I do it tomorrow and provide an update. I'll include tips on the best dehydrator temperature and length of time, as well as how to know when it's done.

I can't wait to get my meat on!

Everything But The...Butter

Chocolate Chip Shortbread!

This is a literal "everything but the butter" recipe - our packaged baking mix will come with everything you need to make this delicious shortbread cookie, all you have to do is add 2 sticks of butter.

Here's the dry mix:

1 1/2 cups all-purpose flour
2/3 cup powdered sugar
1/4 teaspoon salt
1/2 cup chocolate chips

In a medium sized bowl, simply stir in a cup (2 sticks) of room temperature butter into the dry ingredients until it becomes a crumbly consistency with the butter fully incorporated.

Press the mixture (it will be more of a crumble, not a dough) into a 8" by 8" or 9" by 9" glass pan, using a piece of wax paper to help you push it down flat without it sticking to your fingers. You can also use the bottom of a plate or pot to help you get a super flat top.

Place the pan in a pre-heated 300 degree oven for one hour. Just leave it alone, no need to check on it and no need to open the door if you followed the directions.

After one hour, remove the shortbread from the oven and use a sharp knife to cut it into squares, allow to cool for 10-15 minutes before trying to remove the squares from the pan. The cooling allows them to solidify, reducing the potential to crack when you go to remove them.

Chocolate Chip Shortbread Cookies
A fun alternative to cutting the shortbread into squares is using a cookie cutter. Use a sharp edged metal cutter in a simple shape (intricate cutters features smaller angles which won't turn out as well due to the thickness of this recipe). Arrange on a platter and enjoy with a glass of eggnog, as I did last night!

Monday, December 13, 2010

Kitchen Gods

I think most chefs are a little superstitious. Maybe it's their lucky clogs, a favorite pan or a special way of folding their towel in their apron. I, not a restaurant chef, have my kitchen gods to help bring me good luck, and I want you to meet them! These little guys have grown over the years and been picked up from a variety of sources. They live on a shelf in the corner of my kitchen and make me smile whenever I ponder the absurdity of their close quarters.


From left to right:
  • Martian toy from the Japanese market, I bought this while I was in Little Tokyo with my friend Simon years ago.
  • Yellow car - I have no idea how this got here.
  • Green vase - bought this at a store my home town over a weekend during college, it's followed me from home to office back to home and kitchen for five years. I like that it's green.
  • Space man toy - I found this little guy on the beach before I went to a great dinner in Dana point this summer. 
  • Fisherman statue - picked this up at a thrift store I think. He spoke to me.
  • Red radish - when I declared I was decorating my kitchen in red a few years ago, my mother went all out in finding me everything in red, even down to the smallest red radish figurine.
I like to think that all of these odd little creatures help me out when I'm in the kitchen and (hopefully) not burning anything along the way. 

What do your kitchen gods look like?

Scallion Pancakes

One thing I've never seen in "mix" form is scallion pancakes. You've probably had these delightful, fluffy and flavorful pancakes at a Chinese restaurant or maybe at Korean BBQ along with the plethora of salads. These heavier-than-a-crepe pancakes are so easy to make and great with a dash of soy, ponzu or even teriyaki sauce.


In order to inject some umami (the 5th taste) into the "Everything But The..." line of baking mixes, we've come up with a lovely "Everything But The...eggs" recipe for scallion pancakes. Here's the recipe I tested today. I still have some more tweaking to do, but the pancakes had a soft, delectable texture while really delivering an punchy green onion flavor, accented by some sea salt.

Whisk together in a large bowl:
2 eggs
1 cup water
1/4 teaspoon sesame oil (or any vegetable you have around)

Slowly add in the dry ingredients. Once packaged, Everything But The will include all of these dry ingredients, pre-mixed, in our fantastic, eco-friendly containers so all you have to do is pour into the wet ingredients above!

3/4 cup all-purpose flour
1/4 cup rice flour
1/4 teaspoon sea salt
Dash of chili powder
Pinch of fresh ground black pepper
1 cup chopped scallions 

Whisk everything together so that there are no lumps. The great part about the rice flour is it provides a smooth, thin consistency very quickly.

Next, heat a large pan to medium-high heat with 2 tablespoons of oil (vegetable oil works just fine). Pour in about 1/2 cup of your batter mix and pan-fry on one side for about 1-2 minutes, then flip and fry the other side. Watch the pan closely and lift the side of the pancake to check for doneness before flipping.
Once done, transfer to a plate and serve it up with any variety of Asian toppings. Any of the following combinations are great:
  • Ponzu with lemon zest
  • Teriyaki sauce with orange segments
  • Soy sauce with grated ginger and cilantro
  • Wasbi mayonaise 
Next time I'm going to test these with dried shitaki mushrooms to see how I can inject another umami ingredient into the mix. I'm sure I'll have to let it sit at room temperature for a few minutes so the mushrooms can re-hydrate in the batter, but I have high hopes for the outcome.

If you try this at home, let me know your thoughts and leave a comment below.

Oatmeal Accoutrement

It was a lazy weekend...so of course I had to make something fabulous for breakfast (which took place at around noon I believe). Oatmeal sounded easy, healthy and a delightful way to start (er, continue?) the day.

I used quick cooking oatmeal and, to give it some punch, made my accoutrement plate. Included as condiments:

- Brown sugar
- Sliced apples
- Raisins (homemade in my dehydrator)
- Sliced bananas
Oatmeal Accoutrement
Not shown is some chopped walnuts, because I like a little crunch in my oatmeal. Topped off with a splash of milk (and a bit of coarse salt to bump up the flavors) it was a delicious, lazy breakfast.

Finished, yummy oatmeal

Friday, December 10, 2010

So I had a bunch of jalapenos laying around...

I have a love of spicy things. Not just hot, but like blow your socks off hot. Caliente, in fact.

So, of course, it makes it impossible not to buy jalapenos whenever I'm at the Korean market. They're always fresh, glossy and oh so cheap. Last week I bought a bag of about 20 for around 80 cents. A good Jewish girl can always find the best deal on Mexican foods, especially in K-town.

I bought the jalapenos with the intention of making a childhood favorite, hot pepper jelly. Spicy and sweet and a bright green color, I've been addicted since I was a child. I blame my grandmother.

Anyway, I didn't feel like getting out the canning gear today so I hunted down an easier, quicker recipe online. Emeril Lagasse's green chili sauce seemed to do the trick, and was easy as can be.

I diced up all 20 jalapenos along with a small white onion and a few cloves of garlic. Sauteed in a large pan with some oil and salt, I then added water before they could get any color. Letting the mixture cook down for about 20 minutes, I started coughing. Why am I coughing, I thought? Oh, that's right, there's the incredible spice of 20 jalapenos boiling away on my counter. I actually had to leave the room a few times just to breathe.
Peppers in Progress
After 20 minutes, the jalapenos mellowed in color and I left them to cool while I went rearranging my succulent nation (more pics on that soon, totally unrelated to food, of course).

Once cooled, I put the mixture in my fabulous food processor (thank you, Luisa!) and dribbled in a cup of white vinegar as it churned.

Then, I just poured it all (now a fine saucy liquid) into a clean glass jar and placed it in the fridge. Now, I actually don't get to enjoy my hot sauce just yet. Emeril recommends I leave it in the fridge for at least two weeks to develop the flavor, and any man that virtually trademarks the phrase "bam!" is probably a good one to follow.
The finished product! A whole quart
I'll report back in a few weeks when my sauce has "matured" and, lucky me, I probably will never need to buy hot sauce again. My 80 cents may be saving my tens of dollars in the future!

NOTE: Do not put on gardening gloves soon after handling jalapenos. The capsicum (the chemical in chilies that makes them hot) seeped into my pores as the heat of the glove warmed my skin. I have had a burning right hand all day. Not like "oh, that burns", more like "oh, that f***ing burns and throbs and oh my god make it stop!" Good times.

Thursday, December 09, 2010

BUTTER

Today I tested two "Everything but the butter" recipes I've been meaning to bake. The first is a twist on shortbread, the second a low-fat brownie.

Chocolate Chili Shortbread
This take on a classic shortbread incorporates cocoa powder and chili powder (as well as a few red pepper flakes) to really build the flavor. After mixing my dry flour/sugar/etc. mixture, I folded in a stick of butter and pressed the mixture into a round metal pan.

Chocolate Chili Shortbread
The results were not exactly what I hoped for, and I'd like to list them (this recipe came from Epicurious so I blame them for the fail. J/K).
  • Shortbread, though much easier on the home cook to press into a pan, really needs to be rolled out to a thin consistency to reduce the baking time and provide uniformity. 
  • I may be crazy for using chili flakes because I inhaled a flake on first bite, setting off a coughing fit. Lovely. 
  • Cooking time was about 50 minutes, way too long for a leisurely home chef. I need to think of ways to reduce this. 
  • Crunchiness - part of me feels I overbaked it, but it has a really nice crunch that I like. I think I need to eat more mass market shortbread to see what people are generally used to. 
Do you have any favorite shortbread recipes / ideas / flavors you want to share with me? Leave a comment below.

Chocolate Chili Shortbread
Low Fat Brownies
I've tasted some great "just add yogurt" boxed brownies in the market and, though not as gooey or decadent as a full-fat brownie, I feel like there's a great market for a simpler, lighter brownie mix.

To doll mine up I added a teaspoon of cinnamon and a 1/4 cup of chopped walnuts. The walnuts were a great, crunchy addition but the overall consistency of the finished brownies was a bit too cake-like. I'm looking for that super dense kind of brownie mouth-feel. Must keep testing!

Low fat brownies
In looking at some additional yogurt-as-fat brownie recipes online, I saw some commercial producers use wheat gluten and egg white powder to create a more batter-like consistency. I've started my bulk buying list and will be ordering these soon. We'll see what the future testing produce...other than a growing waistline.

So, how do you feel about cinnamon with chocolate?
Are you a brownie purist and only the traditional will do?
Does chili-spiced chocolate get your mojo going?

Leave your reply in the comments below - would love to hear your thoughts!

Nuclear Rice!

Have you tried these delicious little morsels from Trader Joe's? Baked Rick Snacks (Yaki Onigiri).

Yaki Onigiri
Everyone that knows me, knows that I sing the praises of Trader Joe's on a regular basis, but this item is a new favorite! Small (about 2 inch corner to corner) rick snacks that are lightly caramelized and easy to heat and eat. I mean, you microwave for a minute and they taste fresh from the steamer.  Hello awesome.

So, how do I like my nuclear rice? Today I pan-fried some tofu and made a quick cucumber salad to accompany them. (I also devour them on their own in slightly more than one minute).

I love rice wine vinegar, so I dressed the cucumbers in simply that, along with some diced scallions for added crunch. For the tofu, I put a little regular and sesame oil in a pan and fried each side of the tofu "fillets" for about 2 minutes on each side until they brown slightly.

And here's lunch. Notice the nearly fat-free nature of this meal...gotta do something to make up for the pounds of butter, flour and sugar I'm consuming with all the baking I'm doing (more posts on that later).

Pan-fried tofu, deglazed with a little ponzu

Nuclear lunch!

The Simple Things

I've always been a fan of simple, good food. One of the easiest things on the planet to make (and tastes inexplicably better when homemade) is fresh squeezed juice. So this morning I had a bunch of citrus laying around ('tis the season) and decided to do a little squeeze-a-thon.

The great thing about making juice yourself is you can play with the level of sweetness and flavors. This morning I not only had oranges and mandarins, but a past-ripe persimmon and a cut up apple ready for the blending!

I went ahead and juiced all of the citrus and added to the blender full of chopped apple and persimmon. Whirling away, the mixture turned a gorgeous, golden color and was ready for pouring.

Orange Juice 
I'm a fan of pulp-free juice so I simply ran the mixture through a sieve to create a thinner consistency. This also incorporated more air into the juice, which I think makes it taste even lighter. We've all had that orange juice at a diner or even out of the jug that is horribly sweet and cloying. Not this orange juice!

I could have gone to the store, or even that fancy Beverly Hills Juice on Beverly and easily paid $5.00 for this fabulous glass of sunshine. It took five minutes, I can't even make it to down the street in five minutes in LA traffic.

So here I am now, chugging away at my delicious orange juice and telling you all about it. It really is the simple things in life that make it so enjoyable.

The Finished Product

Tuesday, December 07, 2010

Homemade Tortillas

A few weeks ago my sister Lola came down for a visit and, being the Rosenbergs that we are, decided we most certainly must make tortillas...from scratch.

Because that's what we do at 2 p.m. on a weekend when there's nothing better to do.

Luckily, I had picked up some really lovely masa on a recent trip to Houston for a friend's wedding. On our drive to the airport heading home, I made Daniel turn off the road at the last second so we could shop at this giant Latin market. Well worth almost killing ourselves, I'm sure. J/K.

So once inside I of course had to visit every aisle and, without a cart in hand, started stacking everything up in my arms. My arms were le tired. All in all, I picked up some awesome local (or near local) foods, the bounty of Texas! including: stone ground cornmeal, pasta de guayaba (sweet guava paste, often eaten on crackers), pinto beans, fresh baked tortillas, queso de blando (a hard, kind of barnyard sheep's cheese), masa, dried ancho peppers, a giant avocado, magic pop crisps and a new tortilla press. 


The tortilla press came in quite handy for our little tortilla-making session. 

Here's the recipe we used: 


-  2 cups Masa 
-  1 /18 cup water

Mix thoroughly in a large bowl (a big spoon worked well) until mixture resembles a dough ball. Feel free to add a little more water if needed after you've stirred for a minute or two.


Once mixed, pinch off dough into about 2 inch balls, roll in your palm and place in the middle of the tortilla press. I line mine with wax paper so I don't have to spray each side with oil. Press down firmly and lift. That's it, you're done, you've made the first tortilla in your previously handmade tortilla-free life! And you thought tortillas were hard to make. Lola and I made about a dozen tortillas in 15 minutes. 


Stack your fresh tortillas with sheets of wax or parchment paper in between so they don't stick as you heat up your pan. I repurposed my pancake pan for this, just spraying it with a little oil before I put on a new tortilla. Cook on each side for 20-30 seconds, then remove to a warmed plate covered with a towel. The steam in the tortillas will be retained in the towel and keep the tortillas moist. 


Well, we downed those dozen tortillas in about as long as it took to make them. I made a homemade, chunky quacamole with the giant avocado and we sliced off some queso de blando into thin strips so it would melt a little on the warm tortillas. 


Next time you're bored on a weekend afternoon, try making tortillas. Your friends will be totally impressed and you'll have another fabulous tool in your kitchen arsenal...the skill, I mean, as well as the tortilla press, of course. Lord knows I have too many gadgets in my cabinets! 


 Salud!

Monday, December 06, 2010

Quinoa Ratatouille

Tonight I was in a pinch when our friend Chance came over for a last-minute dinner. Knowing him, and knowing Daniel, I knew it needed to be really filling but very healthy. Quinoa is always a staple in my kitchen (I buy it in bulk at Costco, yet it seemingly never runs out). I also had all the ingredients for a ratatouille on hand.

My Mom taught me to make ratatouille when I was younger. Just throw together some onions, eggplant, zucchini (which always seemed a near-continuous crop from my parent's garden) and bell pepper together with some olive oil, salt, pepper and herbs and viola! Dinner.


To add some protein to tonight's dinner I added some really lean ground beef, sauteed in the same pan after I finished the vegetables. The veggies had sauteed to perfection while the quinoa simmered away - it's so easy and versatile, I swear I could find an infinite number of applications.


I thoroughly mixed it all together in the same pot the quinoa had cooked in (my Mom was also a fan of one pot dinners and I can attest I have a distaste for dishwashing) and added some more seasonings.

Turned out delicious and so easy. Done is less than 30 minutes and packing four vegetables, lean protein and the complex carbohydrate of quinoa (which does double-time with as much protein as lean meat).

Served from the pot on the table, it proved a perfect, fast family-style dinner. And, the loving boyfriend that Daniel is, the meal was topped off with a bottle of champagne to celebrate my first day of work!


If you'd like a more detailed recipe for this fantastic dinner, email me.

Bon appetit.

My new office

Take a look at my new home office! With a few small upgrades underway, I'm looking forward to this being my little hub as I launch Cherryvale Farms and our first product line, Everything But The...